![[ Support ]](../../images/titles/support.gif)
Conner/Seagate Harddisc Fitting Instructions

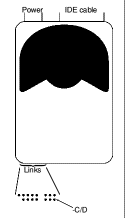
Whilst there are two drives in the machine, one must be set to slave. To do this remove the link marked ‘-C/D’, shown in the diagram. To set the drive to master, put the link back. (Master is drive 4, and slave is drive 5.)
If you have a CD ROM drive fitted or an existing second hard disk, use the power cable from this to power the new hard disk, otherwise you will need to uncoil a power lead from below the floppy drive. Similary use the IDE cable to connect to the new hard disk. If you have a Cumana CD ROM drive fitted, then you must remove the cable from the small printed circuit board, below the floppy drive, and insert this into the new hard disk. Do NOT use the cable going into the CD ROM drive. There is not a lot of give in the Cumana cable.
If you do not have an existing CD ROM drive or second hard disk, then you will need a 3-way IDE cable. The middle connector plugs into the existing hard disk, and then one end to the motherboard, and the other to the new hard disk.
When you turn your machine on, there may be a short delay if the computer is configured for a CD ROM drive as it is attempting to find one that currently does not exist. Use ‘!Boot’ to reconfigure your machine to two IDE disks.
The disk should already have been initialised and titled ‘HardDisc4’. If you have RISC OS 3.5, then you will need to load ‘!HForm’, located in ‘$.Utilities’ to reinitialise the disk to 512Mb, the largest hard disk you can have under 3.5. To do this, load ‘!HForm’ and choose the appropriate drive, 4 for the master and 5 for the slave. You do not want to keep the old shape, you want to choose ‘Other’, and then most settings are what the program gives except for cylinders. This should be set to 1040 to give a 512Mb drive. Then: option A (no more defects); initialise, do not format; make disk bootable if this is to replace your main hard disk; do not soak test, unless you really want to!
Don’t worry about the disk name if you will ultimately be replacing your old hard disk. Copy the contents of your old hard disk over, you should not run out of space if copying from a smaller hard disk, unless you have used a compressed filing system. Rename you hard disk to whatever you want to call it - if it is given the same name as the old hard disk, then you will get an error, but it will still have been renamed.
If you are only having one hard disk, then reconfigure your machine back to one IDE disk, shutdown and turn off. Replace the old hard disk with the new one, but don’t forget to set the hard disk back to master. Plug back in any CD ROM drives and turn on. You may like to keep the lid off until you are happy that everything is working.
If you have any problems, then give us a call whilst you are next to your machine.
Unit 16, Arunside Ind. Est., Fort Road, Littlehampton, BN17 7QU, UK. 01903 523222 (full contact details)
If you have any comments or problems please email sales@cjemicros.co.uk
CJE Micro’s is not responsible for the contents of external internet sites.
Page last updated Saturday, 03-Mar-2007 11:07:15 GMT