![[ Support ]](../../images/titles/support.gif)
Fitting Fujitsu Hard Drives
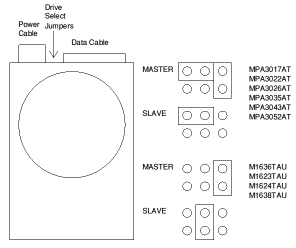
 In order to prepare your new drive for use, it should be connected alongside your original drive. Fujitsu Devices currently come in two types Use the diagram to identify your particular drive, and configure as slave.
Connect the device to your computer and switch on. Double click on !boot, and select Drives. Increase the number of drives to 2, (deselect your CD Rom if necessary). A warning message will appear after you press set, click on OK.
After a short pause a new hard disc icon will appear with the number 5 under it. Run the !Hform program (from your Utilities directory). Make sure you enter disc 5 as the drive to format.
The program will ask a series of questions. The drive type will be other (9) . The program will suggest values for the next five or six questions, all of which can be accepted by pressing enter. ‘A’ should be the response to the question re defects. The Initialise option is sufficient for most purposes as is None on the soak test. You will need the disc to be bootable so answer Yes to the final two questions. The program will prompt for a file allocation size which can be accepted the drive will now be initialised.
If your new drive is over 2 GB in size you will need to press F12 when you return to the desktop, and enter the line
* Con. ADFSBuffers 0
followed by Return twice.
Going to the drive 5 icon on the Icon Bar press the middle mouse button while the pointer is over the icon and then select the top option to name the disc - HardDisc5 is the default name which can be changed if required.
If the new drive is to remain in the computer installation is complete.
If the original drive is to be removed, copy everything from the old drive onto the new one. Once the copy action is finished, change the name of the old drive and rename the new drive to the name previously used by the old one. This will ensure that your system will boot correctly when re-assembled.
Now re-configure the number of hard drives to one and shut down. Remove both hard drives. Re-configure the new drive to ‘Master’ by replacing the jumper removed earlier and replace the drive in the position vacated by the old drive. The computer can be re assembled.
Unit 16, Arunside Ind. Est., Fort Road, Littlehampton, BN17 7QU, UK. 01903 523222 (full contact details)
If you have any comments or problems please email sales@cjemicros.co.uk
CJE Micro’s is not responsible for the contents of external internet sites.
Page last updated Saturday, 03-Mar-2007 11:07:16 GMT